At the end of last week I tidied up a few things that were not complete before I start the engine build in anger.
Firstly I have now finished fitting the fuel pipe run having replaced the connection to the filter with APS fitting which means it will be easier to replace the filter in due course. I got a few marks on the nice annodised parts but these should be OK.
All that now needs to be done is to cut to length but this will be done when the engine is installed.
Monday, 1 August 2016
Bell Housing
I purchased an aluminium bell housing to suit a Ford SMB 302 to Tremec TKO600 from Roadcraft last year. As soon as I got it I was really concerned with the surface finish of the casting. It looks like it is seriously cracked in many places. I had a good chat with Brian at Roadcraft (who has been absoultely brilliant I must add, can't speak more highly of him or Roadcraft as a supplier) who agreed to replace it with the best one could find from his next batch from Tremec. It was exactly the same as the one I had already received. It now looks like the die tooling for the casting has many surface cracks in it and these transfer onto the cast part which gives the 'appearance' of cracking.
![]() |
| Surface defects on the bell housing |
Being a bit sad I did not want to leave my bell housing looking like this so I spend an evening smoothing out all the (or at least as many as I could get at!) imperfections which left a very much more ascetically pleasing apperance although it would not stay shiny for long if left uncoated. I decided to have it powder coated in red, RAL 3030 to be precise and I must say that it now looks really good.
| After coating. All smooth and shiney.... |
At a cost of only £40 I am well pleased. I took it to Rugby Power Coatings. After masking all the machined areas and plugging all the tapped holes they had it media blasted to provide a good key for the powder coat. They undercoated it first with a zinc rich primer as this can aid in creating a better bond but also creates a thicker smoother overal finish on the coated parts.
Tuesday, 12 July 2016
Handbrake Mech - Pt 3
I finally found the time to start looking at the mod to the chassis to fit the 'pulley' setup for the revised handbrake mechanism. I was a bit concerned about drilling trhough the plate as the position is a bit tight to get at. I had no need to worry as all went really well from the start.
I carefully covered everything that I didn't want to be covered with swarf and then started to drill a pilot hole of 4mm As soon as it was a couple of millimeters deep I carefully rotated the drill to the correct angle to line up with the groove in the pulley and completed the hole.
This was then followed with a 20mm diameter hole saw which had its own pilot of 8mm diameter. As before i started the drill and after a few mm aligned it with the 4mm pilot hole. This made getting it all aligned a little easier. I had to be very careful as the hole saw started to cut into the plate as it was just a one sided cut so all had to progress slowly and carefully. The hole saw atr through the chassis plate much better than hoped and I have ended up with a pretty tight hole for the adapter tube.
Next I had to cut the slot for the cable. This was a labouious job and painfully slow. I ended up chain drilling a 4mm hole and using the drill as a slot drill to join all the holes up. Filing the slot was also really slow as access is tricky. Still got a little to do to make all smooth and straight (I'm a bit OCD as all has to be true and straight!).
Only thing's to do now is to weld in the adapter, clean up and repaint the whole area.
On the whole I am really pleased with the progress, just need to get that welder!!!
I carefully covered everything that I didn't want to be covered with swarf and then started to drill a pilot hole of 4mm As soon as it was a couple of millimeters deep I carefully rotated the drill to the correct angle to line up with the groove in the pulley and completed the hole.
This was then followed with a 20mm diameter hole saw which had its own pilot of 8mm diameter. As before i started the drill and after a few mm aligned it with the 4mm pilot hole. This made getting it all aligned a little easier. I had to be very careful as the hole saw started to cut into the plate as it was just a one sided cut so all had to progress slowly and carefully. The hole saw atr through the chassis plate much better than hoped and I have ended up with a pretty tight hole for the adapter tube.
Next I had to cut the slot for the cable. This was a labouious job and painfully slow. I ended up chain drilling a 4mm hole and using the drill as a slot drill to join all the holes up. Filing the slot was also really slow as access is tricky. Still got a little to do to make all smooth and straight (I'm a bit OCD as all has to be true and straight!).
|
|
| Template added to chassis. Looks tight!!! |
|
|
| Drilling with the 20mm diameter hole saw. All covered. |
|
|
| Hole completed. |
|
|
| Slot added. Now just to angle and clean up. |
Only thing's to do now is to weld in the adapter, clean up and repaint the whole area.
On the whole I am really pleased with the progress, just need to get that welder!!!
Monday, 11 July 2016
Engine - Pt 2
After the initial set back of the first block being cracked I got the second block back fully machined with no further issues. I had all my machining done by Dave at Dave's American Machine Shop over in Hinckley and a very good job he did too.
Dave initially measured the block to see what how it stood before machining. He then proceeded to machine the deck height and square up the head faces to the bores. The bores were then machined to +0.030" taking the bore to 4.030" and with stroked crankshaft I will now have a 347 up from a 302 as standard. After machining and honing the bores he tapped the smaller core plug holes for better sealing. Following this he chemically cleaned the block and when rinsed and dried he inserted new cam bearings. He also provided a full core plug kit for me which I will fit in due course.
When I got the block back home the first thing I did was to clean it again as I wanted to get all necessary areas painted. I've decided to paint the block in a neutral colour, that being a graphite engine enamel. This needed several sprayed coats and I am really happy with how it looks. Dave also advised me to paint the inside of the block particularly the area below the intake manifold and each end as well. This really helps with oil drain back to the sump. He uses good old Wilco red oxide primer and then follows this with a couple coats of their red tile paint. I've duly taken his advice and all looks good.
I guess what I should have done is given you the specification (so far!) of what I am building, a bit out of order but here goes:-
Back to where I was....
I sent all of the rotating parts out dynamic balancing and I'm pleased to say that all went well with little work needing to be done. All in the balancing was able to be done internally (mainly on the crankshaft counter balance weights. Pistons and rods also had a little fettling as well.
The parts that went for balancing were as follows:-
Dave initially measured the block to see what how it stood before machining. He then proceeded to machine the deck height and square up the head faces to the bores. The bores were then machined to +0.030" taking the bore to 4.030" and with stroked crankshaft I will now have a 347 up from a 302 as standard. After machining and honing the bores he tapped the smaller core plug holes for better sealing. Following this he chemically cleaned the block and when rinsed and dried he inserted new cam bearings. He also provided a full core plug kit for me which I will fit in due course.
When I got the block back home the first thing I did was to clean it again as I wanted to get all necessary areas painted. I've decided to paint the block in a neutral colour, that being a graphite engine enamel. This needed several sprayed coats and I am really happy with how it looks. Dave also advised me to paint the inside of the block particularly the area below the intake manifold and each end as well. This really helps with oil drain back to the sump. He uses good old Wilco red oxide primer and then follows this with a couple coats of their red tile paint. I've duly taken his advice and all looks good.
|
|
| Block 2 at collection - image 1 |
|
|
| Block 2 at collection - image 2 |
|
|
| Midway through red oxide priming |
|
|
| Completed block. I'm really pleased with the result |
I guess what I should have done is given you the specification (so far!) of what I am building, a bit out of order but here goes:-
- Small block Ford 302 bored and stroked to 347;
- Scat Series 9000 Cast Pro Comp Stroker Lightweight Crankshaft 9-302-3400-5400-2123;
- SBF 28oz Fluidamper 6 5/8" FLU650211;
- Scat Pro Stock I-Beam Floating Pin Connecting Rods 2-ICR5400-927;
- Keith Black KB Performance Pistons KB246030-8;
- Clevite main and rod bearings;
- COMP Cams Xtreme Energy Camshaft 35-518-8;
- Ford Racing Fuel Pump Eccentric M-6287-B302;
- Melling Camshaft Thrust Plates MF126;
- Lunati Street Performance Retro-Fit Hydraulic Roller Lifters 72335-16;
- Harland Sharp Original Roller Rockers S4102 Ratio 1.6:1;
- Cylinder heads AFR 165cc/185cc/195cc SBF Renegade 20 Degree Street/Strip 1388;
- Pushrods will be supplied by Peter Knight Racing TBC;
- Edelbrock Performer Carburettor 600cfm 14064;
- Edelbrock Performer RPM Intake Manifold 71214;
- Ford Racing Timing Chain Set M-6268-A302;
- Edelbrock Victor Series Mechanical Water Pumps 88414;
- MSD 6AL Ignition system MSD-6425;
- Distributor MSD-84791;
- Ignition coil MSD-8200;
- ARP headstud kit ARP-254-4405;
- ARP Main Bolt set ARP-154-5001;
- FelPro gaskets througout;
- Miloden oilpan MIL-31600, larger capacity same depth as standard;
- Miloden oil pump pickup MIL-18485;
- Melling oil pump MEL-M68;
- Melling oil pump drive shaft MEL-IS-68;
- Single piece rear main seal FEL-2922RS;
- Transmission TKO600 with upgrade to McLeod RST twin plate clutch;
I'm sure that there will be more parts (no doubt I've forgotten a whole load and will need to order more!) but I will update as I progress forward.
Back to where I was....
I sent all of the rotating parts out dynamic balancing and I'm pleased to say that all went well with little work needing to be done. All in the balancing was able to be done internally (mainly on the crankshaft counter balance weights. Pistons and rods also had a little fettling as well.
| All the parts ready for balancing. |
- Crankshaft;
- Con-rods;
- Pistons and pins (now matched);
- Clutch assembly and bolts;
- Flywheel and bolts;
- Damper;
- Piston rings, big end bearings and gudgeon pin wire locks were needed for weights;
Tuesday, 14 June 2016
Brake & Clutch pipes - Pt 5
As mentioned in the last brake pipe post I may have to re-do one of the pipes due to the fuel pipe run. Now that I have now pretty much sorted the fuel pipe run this did indeed mean that I had to re-do the nearside rear brake pipe. This was only a short pipe and took only a short time to do but all now clears and I am happy with the result.
The brake pipes are now complete apart from the short runs to the master cylinder. These will be done when the body is on maybe later this year depending how I get on with engine build and installation.
I also decided to change all of the fixings I was using to fasten the pipe clamps from stainless button head screws to grade 10.9 zinc plated button head screws. I was finding that the hex socket in the stainless ones was stripping a little to easily when trying torquing up. Rather sort now than when the car is complete and I find I can't get in there and the head strips. All fixings have spring washers and thread lock. Not only does this stop the screws from vibrating loose the threads are sealed into the chassis as well.
| The new pipe runs above the fuel pipe (a short length of coper is shown clamped wheel the pipe will run) |
I also decided to change all of the fixings I was using to fasten the pipe clamps from stainless button head screws to grade 10.9 zinc plated button head screws. I was finding that the hex socket in the stainless ones was stripping a little to easily when trying torquing up. Rather sort now than when the car is complete and I find I can't get in there and the head strips. All fixings have spring washers and thread lock. Not only does this stop the screws from vibrating loose the threads are sealed into the chassis as well.
Saturday, 4 June 2016
Fuel line - Pt 2
Finally now I have had a little time to get back out in the garage a fit the now painted fuel pipe and fuel tank permanently (at least for now!). I spent a lot of time de-burring the connections of the tank and then attempted to get all those little bits out rather than just catching them all in the filter. After hafl an hour or so I finally gave up realising that I was just not going to be able to get them all accepting that I would have to change the filter sooner than hoped.
|
|
| Forward part of the pipe |
|
|
| Rear connection to tank well clear of all bolts. |
| New nearside brake pipe formed and fitted |
Now I have thought about removing/cleaning the filter I have decided to change the connection to the front of the filter. I am going to change it to an APS anodised fitting to make removal that much easier. Still need to order the parts so this will be done a little later.
Fuel line - Part 1
With the brake and clutch lines completes as far as I can for now the next thing was to start looking at is the fuel line. As far as I can see the normal route on an AK is to run it under the diff and then route it along the inner face of the nearside chassis rail (for Ford anyway) with the fuel filter as close to the rear as you can get as the transmission tunnel area widens just before the diff mounting plate.
I have seen many routings under the diff that are very well done with a suitable guard but this route has always bothered me as the fuel line is then the lowest thing under the car and there is a risk of grounding on the guard. I spent quite a while reading through various build blogs and eventually posted a question about this on the UK Cobra Club Forum recently. I got a few replies (thanks to all) and there was one who has done what I was hoping to do and this was Steve and he very kindly added photos of his route on http://stevesakcobrabuild.blogspot.com, Nov 2015. This means that the fuel pipe is then completely within the height of the chassis and pretty much fully protected (the only area on minor concern is at the fuel outlet from the tank. May still need a much smaller guard here!). I will be able to secure the pipe by using either one of the diff cover bolts or the tie bar bolt adding a small bracket and then also adjacent to the diff with a clamp on top of the chassis rail.
I've realised that this does mean however that I will have to re-do the nearside rear brake pipe but no worries, this is just a short length.
Anyway The first thing I decided to do was to sort the position of the fuel filter. This will be on a small bracket bolted to the chassis. The bracket is slightly angled to help the 'run' of the pipe.
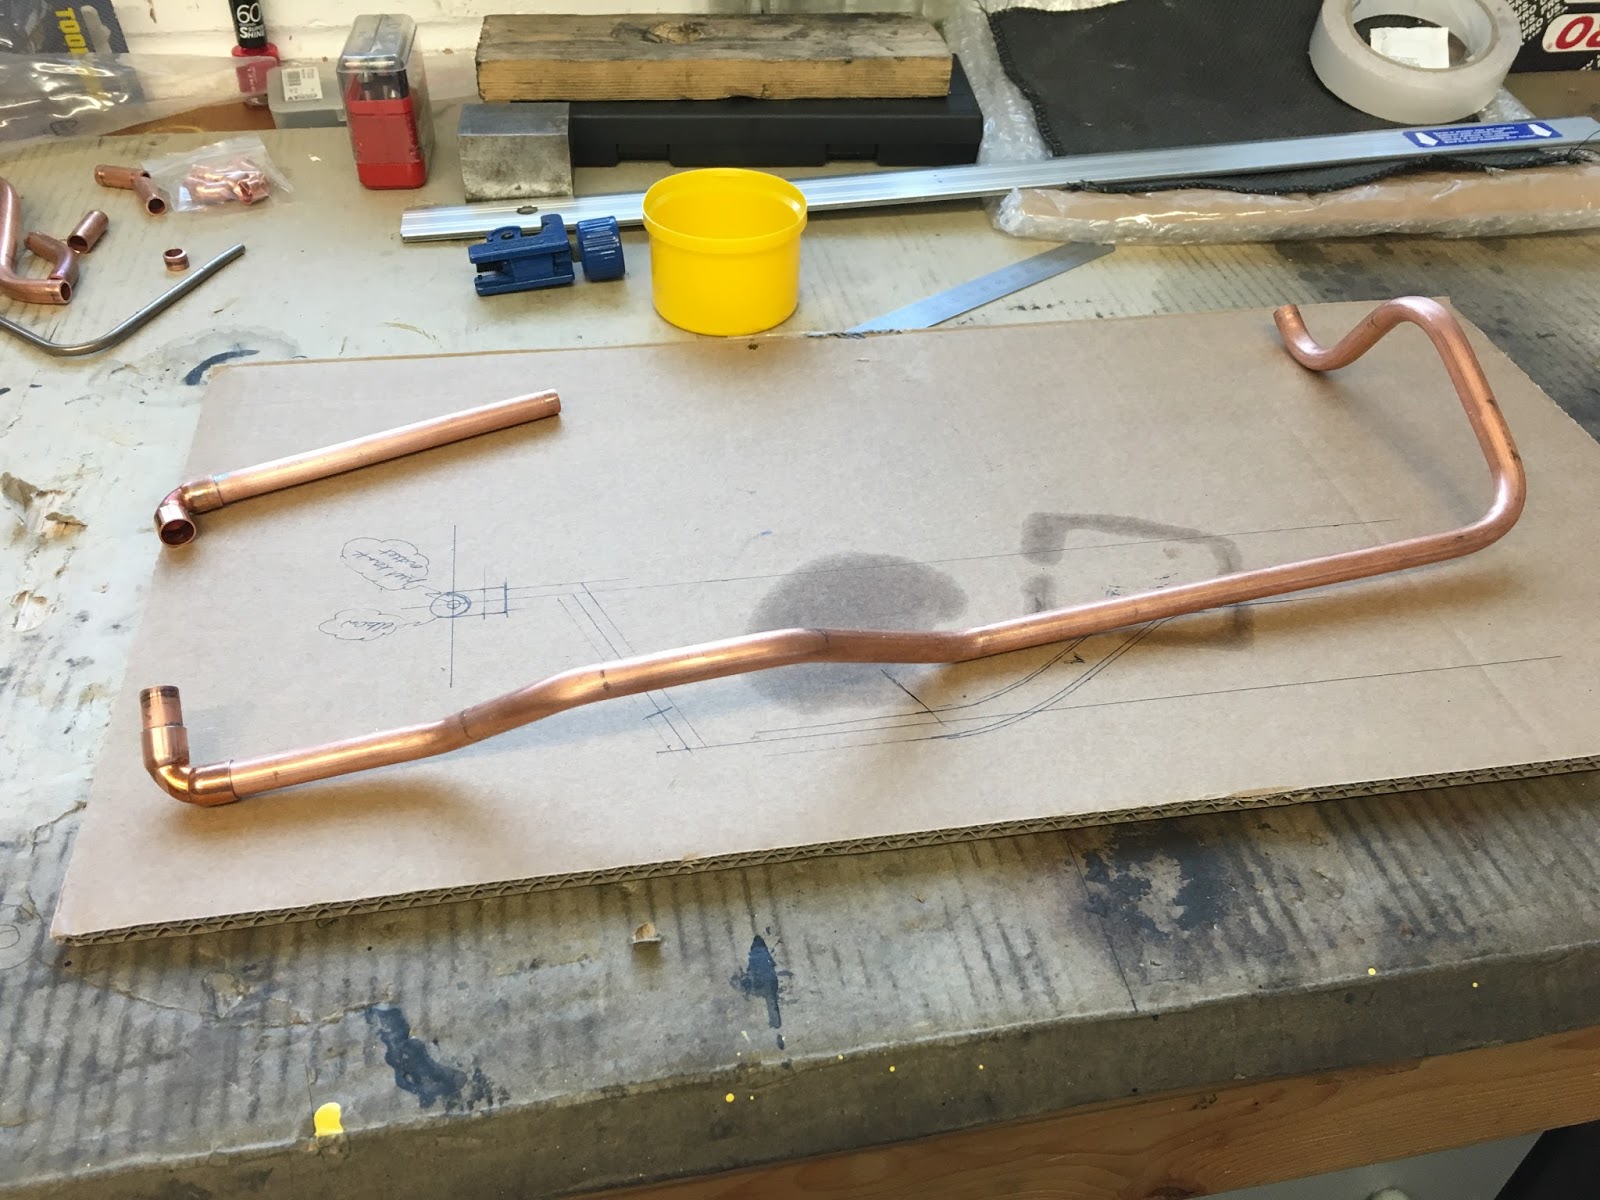
For the part from the tank to the filter I'm using 10mm copper pipe. The route is pretty tortuous but actually proved quite satisfying when all bent to shape although it took several goes to get it right (including the kinked one!! last but one bend). The copper pipe is supplied 'coiled' so has to be straightened by hand! This a slow laborious process unless you purchase yet another pipe straightener but I'm not going to spend the money on that! Hopefully I shan't need to do it again (but I did!!!)
The pipe from the tank will be fitted when I have sorted fuel sender and when the tank is flushed and finally fitted permanently (at least that is the plan).
I have now run the braided hose from the filter up to the engine mount area. Still need to determine exactly where this needs to be fastened for the pump in my case an Edelbrock Performer RPM Street Fuel Pump 110gph mechanical unit (EDL 1725).
I have seen many routings under the diff that are very well done with a suitable guard but this route has always bothered me as the fuel line is then the lowest thing under the car and there is a risk of grounding on the guard. I spent quite a while reading through various build blogs and eventually posted a question about this on the UK Cobra Club Forum recently. I got a few replies (thanks to all) and there was one who has done what I was hoping to do and this was Steve and he very kindly added photos of his route on http://stevesakcobrabuild.blogspot.com, Nov 2015. This means that the fuel pipe is then completely within the height of the chassis and pretty much fully protected (the only area on minor concern is at the fuel outlet from the tank. May still need a much smaller guard here!). I will be able to secure the pipe by using either one of the diff cover bolts or the tie bar bolt adding a small bracket and then also adjacent to the diff with a clamp on top of the chassis rail.
I've realised that this does mean however that I will have to re-do the nearside rear brake pipe but no worries, this is just a short length.
Anyway The first thing I decided to do was to sort the position of the fuel filter. This will be on a small bracket bolted to the chassis. The bracket is slightly angled to help the 'run' of the pipe.
| Filter and stainless bracket |
|
|
| Version 2 finished & ready for soldering so I thought! |
|
|
| Kinked! Last but one bend. Another opportunity! |
|
|
| Version 3 ready for last bits to be soldered |
|
|
| 3mm stainless bracket to fix to tie-bar bolt |
|
|
| From tank past tie-bar to bracket |
| Under diff body well away from the drive shaft flange |
| Painted and ready for fitting |
I have now run the braided hose from the filter up to the engine mount area. Still need to determine exactly where this needs to be fastened for the pump in my case an Edelbrock Performer RPM Street Fuel Pump 110gph mechanical unit (EDL 1725).
| Braided hose run so far |
Subscribe to:
Posts (Atom)