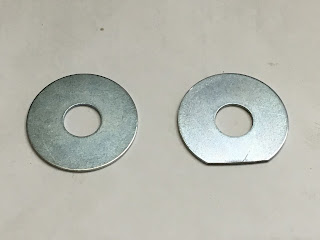
I have now attempted to fit the diff assembly. I realised pretty quickly that there was a slight interference between the chassis and the diff body around the 2 upper fixings and also there was a larger gap (approx. 7mm) between the diff and the chassis than was expected. I had a chat with AK and they confirmed that this was to be expected depending on which diff you fit. Obviously mine was not the one that the chassis was specifically designed for so a little bit of grinding was performed and additional spacers were purchased.
 |
Great!!! Seems to be a small foul at the top and a bit more gap between the diff and the mount point as well.
|
 The photo above shows the template and the photo to the right shows the foul. No major worries though. Quickly sorted with an angle grinder s splash of paint.
 |
 |
To enable the spacer washers to fit correctly into the machined cut-out on the back of the diff a little modification needed. These all now fit really well. I had to purchase a couple of different grades of washer to get the different thicknesses to get to the 7mm thickness I needed.
I finally thought that I had got the diff sorted. I added the nuts and washers and began tightening to the correct torque. Very quickly it became apparent that the four studs around the diff nose were too short! No option but to remove the diff and unscrew the studs a few more threads, I'd simply screwed them in too far. Another very important note is that you cannot use stainless nylock's. They simple can't take the torque needed. As I was tightening one of them I realised that it was not getting tighter so removed the nut and could see deformation of the thread. No option but to buy some more Grade 8.8 nuts and discard any stainless ones sitting around.
 |
| Diff finally installed. Just need to check the torque of each nut and then paint spot each when OK. Oil now added, 2.1 litres of LSD oil as recommended. Just to the lip of the drain hole. |


No comments:
Post a Comment